Kotlin Coroutines入門 for Server-Side
社内向けに書いた文章を一部編集してブログにも公開しています。
目的
- Kotlin Coroutinesについての話を書きます。主にサーバーサイド向けです。
- わかりやすさ優先で書くので、正確には正しくない表現がされていないことがあるかもしれません。ご容赦ください。
はじめに
まずはじめに断っておくと、文章等を読むだけだとKotlin Coroutinesを理解するのは難しいと思います。
この記事のサンプルコードを元に(自分で改変もしたりして)、実際に自分の手元で動かして挙動を確認すると理解が深まると思います。とにかく最初は小さいコードを色々と動かしてみてください。
Kotlin Coroutinesはライブラリとして実装されているため、ちょっと内容は難しいですがコードも読むことができます。
何事もそうですが、documentだとよくわからないこともコードを読んだらわかったりするので、コードを読む癖もつけるといいと思います。
コルーチンとは
まずはじめに、コルーチンとはなんなんでしょうか?
簡単にいうと、ある一連の処理の中で、中断と再開をすることができるようにするテクニックだと思ってもらえばいいです。
(学術的にいうと「対称コルーチン」だとか「非対称コルーチン」だとかもあるんですが、ここではスルーします。詳しく知りたい人は月刊ラムダノートの記事を読むといいです)
といわれても、当然これだけではいまいちわからないと思います。なんでそんなテクニックが必要なのかもピンとこないでしょう。
というわけで、実際の例で説明しましょう。
"GET /api/me/favoriteItems"というサーバーAPIを例にします。request header内のtokenを使って認証処理をし、そのユーザーのお気に入りのアイテムを取得するエンドポイントだと想定してください。
Kotlin Coroutinesを使わない従来の実装だと、このようになります。
fun getFavoriteItems(request: HttpRequest): List<Item> {
    val token = request.header("x-some-token") // ①
    val user = getLoggedInUser(token) // ② network IO処理
    return getFavoriteItems(user.userId) // ③ network IO処理
}
tomcatの場合、これらの処理はリクエストごとにリクエストスレッドプール(200個あるとする)内のスレッドを1つを専有して、以下のような処理を順番に行います。
- Read request
- request.header("x-some-token")
- getLoggedInUser(token)
- getFavoriteItems(user.userId)
- Write response
この処理の大部分はI/O待ち(黄色部分)です。CPUが実際に稼働するのは、青色部分の処理だけです。この図だと割合が半々に見えますが、実際のWEBアプリケーションだとほとんどがI/O待ちとなります。
このI/O待ちのためにわざわざスレッドをたくさん用意していることになります。
これを解決する方法として、non-blocking I/Oにしてコールバックスタイル(event-loop)で書く方法があります。(ref: Java/Kotlinにおける非同期プログラミング)
fun getFavoriteItems(request: HttpRequest, response: HttpResponse) {
    val token = request.header("x-some-token")
    getLoggedInUser(token) { user -> // コールバック
        getFavoriteItems(user.userId) { items -> // コールバック
            response.ok(items)
        }
    }
}
上記のコールバックスタイルですが、実は見方を変えると中断と再開をしています。getLoggedInUser関数を呼び出したタイミングで中断し、結果が取得できたタイミングで再開をしている、といったように見ることもできます。
fun getFavoriteItems(request: HttpRequest, response: HttpResponse) {
    val token = request.header("x-some-token")

    // getLoggedInUserを呼び出したら中断
    getLoggedInUser(token) { user ->
        // 結果(user)が取得できたら再開

        // getFavoriteItemsを呼び出したら中断
        getFavoriteItems(user.userId) { items ->
            // 結果(items)が取得できたら再開

            response.ok(items)
        }
    }
}
この中断と再開を、プログラミングのSyntaxとして実現しているのがKotlin Coroutinesです。
Kotlin Coroutinesを使って同じエンドポイントを実装すると以下のようになります。suspend functionを使用するのがポイントです。(後述)
詳しいことはこれから説明するので、現時点ではプログラムの見た目が変わらなくて書きやすそう、という認識さえあればいいです。
suspend fun getFavoriteItems(request: HttpRequest): List<Item> {
    val token = request.header("x-some-token")
    val user = getLoggedInUser(token) // getLoggedInUserもsuspend function
    return getFavoriteItems(user.userId) // getFavoriteItemsもsuspend function
}
一連の処理の中で中断と再開ができるようになったため、以下のようなイメージで稼働することができるようになります。I/O待ちのような中断可能な処理のタイミングで中断/再開をすることで、1つのスレッドで複数の処理を並行で行うことができます。 あたかも複数の処理(routine)が協調(co-)して動いているように見えます。そのため、Coroutineと呼ぶわけです。

また、1つのスレッドしか使っていないのに、中断と再開を駆使することでまるで複数のスレッドを使っているかのような動きをします。こういった特徴からコルーチンは軽量スレッドと呼ばれることもあります。
では、軽量とはどういう意味でしょうか?通常、スレッドは1つあたり1MB程度使用します。一方コルーチンは1KB程度しか使用しません。
実際に次のようにスレッドを10万個作成すると、OOMEが発生することが確認できます。
fun main() {
    repeat(100_000) { // launch a lot of threads
        thread {
            Thread.sleep(5000L)
            print(".")
        }
    }
}
Exception in thread "main" java.lang.OutOfMemoryError: unable to create native thread: possibly out of memory or process/resource limits reached
    at java.base/java.lang.Thread.start0(Native Method)
    at java.base/java.lang.Thread.start(Thread.java:803)
    at kotlin.concurrent.ThreadsKt.thread(Thread.kt:42)
    at kotlin.concurrent.ThreadsKt.thread$default(Thread.kt:20)
    at com.example.demo.OOMEKt.main(OOME.kt:7)
    at com.example.demo.OOMEKt.main(OOME.kt)
これをコルーチンにすると、OOMEが発生することなく実行することができます。軽量感を味わうことができますね。
fun main() = runBlocking {
    repeat(100_000) { // launch a lot of coroutines
        launch {
            delay(5000L)
            print(".")
        }
    }
}
Coroutinesの基本
基本のキ
次のようなコードを実行してみます。
fun main() {
    printlnWithThread("start")

    runBlocking {
        launch {
            printlnWithThread("1")
            delay(2000L)
            printlnWithThread("4")
        }
        launch {
            printlnWithThread("2")
            delay(1000L)
            printlnWithThread("3")
        }
    }

    printlnWithThread("end")
}

// この関数は他のサンプルコードでも登場します。
fun printlnWithThread(text: String) {
    println("[${Thread.currentThread().name}] $text")
}
どういう順番で標準出力に表示されるでしょうか?runBlocking, launchといった見慣れない関数があると思いますが、もしもあなたがコルーチンという概念を一切知らない場合、「start → 1 → 4 → 2 → 3 → end」だと答えるかもしれません。通常、プログラムは上から順番に実行されるからです。
しかし実際の結果はこのようになります。
[main] start
[main] 1
[main] 2
[main] 3
[main] 4
[main] end
上記のコードに注釈をつけ、さらに図示するとこのようになります。
fun main() {
    printlnWithThread("start")

    // runBlocking内でCoroutineScopeを作成
    runBlocking {
        launch { // block内の処理をコルーチンとして実行
            printlnWithThread("1")
            delay(2000L) // 中断し、2秒後に再開する
            printlnWithThread("4")
        }
        launch { // block内の処理をコルーチンとして実行
            printlnWithThread("2")
            delay(1000L) // 中断し、1秒後に再開する
            printlnWithThread("3")
        }
    }
    // runBlocking内で起動したコルーチンがすべて終了するまで待機する

    printlnWithThread("end")
}
runBlockingはCoroutineScope(後述)を作成し、runBlocking内で起動したコルーチンの実行が完了するまで待機する関数です。
CoroutineScope内でlaunch関数を使うことで、引数で渡すblock内の処理をコルーチンとして実行することができます。
したがって上記のコードは上の図の通り、以下のように動くわけです。
- startを出力
- runBlockingでCoroutineScopeを作成
- launchで2つのコルーチンを起動。
- 2つのコルーチンが協調(中断/再開)してmainスレッド上でコルーチンとして動作する (1 → 2 → 3 → 4の順で出力)
- 2つのコルーチンが終了するのをmainスレッド上で待機
- endを出力
- main関数が終了する
コルーチンなしに上記の処理を書くと直列でdelayを実行するため3sec + αほど実行にかかってしまうわけですが、コルーチンの中断/再開を駆使することで2sec + αで完了します。
例がdelayなのでいまいちありがたみがわかりませんが、Coroutine 1とCoroutine 2がなにかのnetwork IO処理だとしたらどうでしょうか?無駄な待ち時間を短縮できて嬉しいですよね。(もちろん、スレッドでも同様のことが実現できますが)
次は上のコードの少しリファクタリングしてみます。それぞれのlaunch内の処理を関数として切り出しましょう。
fun main() {
    printlnWithThread("start")
    runBlocking {
        launch { print1And4() }
        launch { print2And3() }
    }
    printlnWithThread("end")
}

fun print1And4() {
    printlnWithThread("1")
    delay(2000L)
    printlnWithThread("4")
}

fun print2And3() {
    printlnWithThread("2")
    delay(1000L)
    printlnWithThread("3")
}
しかし、これらはコンパイルエラーになります。print1And4とprint2And3内で、delayというsuspend functionを呼び出しているからです。suspend functionとはその名の通り中断可能な関数のことで、CoroutineScopeの中 もしくは suspend function からじゃないと呼び出すことはできません。
// コンパイルエラー
fun main() {
    delay(1000)
}
print1And4とprint2And3にもsuspend修飾子をつけ、suspend functionにするとコンパイルできるようになります。ただし、print1And4とprint2And3もsuspend functionとなったことで、CoroutineScopeの中(以下の例だとrunBlockingの中)じゃないと呼び出すことができなくなりました。その代わりにprint1And4とprint2And3内でdelayというsuspend functionを呼び出すことが可能となります。
fun main() {
    printlnWithThread("start")
    runBlocking {
        launch { print1And4() }
        launch { print2And3() }
    }
    printlnWithThread("end")
}

suspend fun print1And4() { // suspendをつける
    printlnWithThread("1")
    delay(2000L)
    printlnWithThread("4")
}

suspend fun print2And3() { // suspendをつける
    printlnWithThread("2")
    delay(1000L)
    printlnWithThread("3")
}
launch と Job
次のようなコードがあります。前述してきたとおり、特に実行結果に違和感はないはずです。
fun main() {
    runBlocking {
        launch {
            // job1
            delay(2000)
            println("job1 end")
        }

        launch {
            // job2
            delay(1000)
            println("job2 end")
        }
    }
}

// 実行結果
job2 end
job1 end
最初のコルーチン(job1)が終了するのを待機してから、次のコルーチンを実行したいケースがあるときはどうすればいいでしょうか?
実はlaunch関数はJobというインスタンスを返します。Jobのjoinメソッドを呼び出すことで、そのコルーチンが終了するまで中断(待機)することができます。ちなみに、このjoinメソッドもsuspend functionです。
例えば次のように書くと、実行結果が変わることを確認できます。
fun main() {
    runBlocking {
        val job1 = launch {
            // job1
            delay(2000)
            println("job1 end")
        }
        job1.join()

        val job2 = launch {
            // job2
            delay(1000)
            println("job2 end")
        }
        job2.join()
    }
}

// 実行結果
// job1のあとでjob2が実行されている
job1 end
job2 end
ExecutorService#submitとFutureのような感じですね。察しがいい人は気づいていると思いますが、Jobはキャンセルすることもできます。では、job1をキャンセルしてみます。
fun main() {
    runBlocking {
        val job1 = launch {
            // job1
            delay(2000)
            println("job1 end")
        }
        delay(1000) // job1が実行されるのを待つ
        job1.cancel() // job1の途中でキャンセルする
        job1.join() // job1のキャンセルが完了するのを待つ
        // job1.cancelAndJoin() でもいい

        val job2 = launch {
            // job2
            delay(1000)
            println("job2 end")
        }
        job2.join()
    }
}

// 実行結果
// job1はキャンセルされているので出力されない
job2 end
キャンセルされると、CancellationExceptionが発生します。コルーチン内でなにかしらのリソースを開いているときにキャンセルしてしまうと適切にcloseすることができないため、場合によってはリソースリークが発生することがあります。そういうときはfinallyにてリソースの開放をしましょう。(kotlinなのでtry-finallyじゃなくてuseメソッドを使ってもいいです)
fun main() {
    runBlocking {
        val job1 = launch {
            try {
                // job1
                delay(2000)
                println("job1 end")
            } catch (e: CancellationException) {
                // catchすることで、cancelされたことがわかる
                println("job1 canceled")
                throw e
            } finally {
                // finallyも実行するので、リソースのclose処理などを行える
                println("finally of job1")
            }
        }
        delay(1000) // job1が実行されるのを待つ
        job1.cancel() // job1の途中でキャンセルする
        job1.join() // job1のキャンセルが完了するのを待つ

        val job2 = launch {
            // job2
            delay(1000)
            println("job2 end")
        }
        job2.join()
    }
}

// 実行結果
// catch, finallyが実行される
job1 canceled
finally of job1
job2 end
リソースのclose処理にsuspend functionを実行しているケースもあると思います。そういう場合、そのsuspend functionを実行する時点でcancelされてしまうため、適切に終了することができません。
fun main() {
    runBlocking {
        val job1 = launch {
            try {
                // job1
                delay(2000)
                println("job1 end")
            } catch (e: CancellationException) {
                println("job1 canceled")
                throw e
            } finally {
                // close処理内にsuspend function(delay)がある
                delay(1000) // これを実行する時点でfinally内の処理もキャンセルされる
                println("finally of job1")
            }
        }
        delay(1000) // job1が実行されるのを待つ
        job1.cancel() // job1の途中でキャンセルする
        job1.join() // job1のキャンセルが完了するのを待つ

        val job2 = launch {
            // job2
            delay(1000)
            println("job2 end")
        }
        job2.join()
    }
}

// 実行結果
// finally of job1が出力されないことが確認できる
job1 canceled
job2 end
withContext(NonCancellable) を使用することで解決することができます。(withContext, CoroutineContextについては後述します)
fun main() {
    runBlocking {
        val job1 = launch {
            try {
                // job1
                delay(2000)
                println("job1 end")
            } catch (e: CancellationException) {
                println("job1 canceled")
                throw e
            } finally {
                withContext(NonCancellable) {
                    delay(1000)
                    println("finally of job1")
                }
            }
        }
        delay(1000) // job1が実行されるのを待つ
        job1.cancel() // job1の途中でキャンセルする
        job1.join() // job1のキャンセルが完了するのを待つ

        val job2 = launch {
            // job2
            delay(1000)
            println("job2 end")
        }
        job2.join()
    }
}

// 実行結果
job1 canceled
finally of job1
job2 end
Jobのキャンセルについては、後ほどまた深堀りします。
async と Deferred
launchで複数の処理を協調して並列で実行できることはわかりましたが、処理の結果を利用したい場合はどうすればいいでしょうか?
その場合は、async関数を使うことで実現することができます。launchのときは返り値の型はJobでしたが、asyncのときはDeferred
fun main() {
    runBlocking {
        val deferred1 = async {
            delay(1000)
            "deferred1"
        }
        println(deferred1.await())

        val deferred2 = async {
            delay(1000)
            "deferred2"
        }
        println(deferred2.await())
    }
}

// 実行結果
deferred1
deferred2
上のコードは個別にawaitしていたので2secほどかかっていますが、同時にawaitすることもできます。この場合、1 secですみます。
fun main() {
    runBlocking {
        val deferred1 = async {
            delay(1000)
            "deferred1"
        }

        val deferred2 = async {
            delay(1000)
            "deferred2"
        }

        println("${deferred1.await()}, ${deferred2.await()}")
    }
}

// 実行結果
deferred1, deferred2
DeferredはJobでもあるので、キャンセルすることもできます。ただし、キャンセルした場合、awaitを実行した場所でCancellationExceptionが発生します。async内でCancellationExceptionをキャッチしてfallbackしても、そのfallbackした値(下の例だと"canceled"という文字列)はawaitの結果として取得することができないので注意してください。
(CancellationExceptionをキャッチしてfallbackするというケースは稀だと思うので、この挙動にハマることはないとは思うが)
fun main() {
    runBlocking {
        val deferred1 = async {
            try {
                delay(1000)
                "deferred1"
            } catch (e: CancellationException) {
                println("deferred1 canceled")
                "canceled"
            } finally {
                println("finally of deferred1")
            }
        }
        delay(100) // asyncが実行されるの待つ
        deferred1.cancel()
        println(deferred1.await()) // ここでCancellationExceptionが発生する
    }
}

// 実行結果
deferred1 canceled
finally of deferred1
Exception in thread "main" kotlinx.coroutines.JobCancellationException: DeferredCoroutine was cancelled; job=DeferredCoroutine{Cancelled}@1f57539
CoroutineScope
Kotlinでコルーチンを実行するには、CoroutineScopeが必要です。CoroutineScopeとはコルーチンを管理するものだと思ってください。
JavaのExecutorServiceで例えるなら、
- ExecutorService ↔ CoroutineScope
- ExecutorService#submitで実行するRunnable/Callable ↔ コルーチン
に対応すると思ってください。(だいぶぶっ飛んだ例えなので、あまり良い例えではないかもしれない)
今までの例でCoroutineScopeなんて作ってなかったじゃん、と思っている人もいると思います。先程もしれっと書いていましたが、runBlockingという関数によってCoroutineScopeを作成していました。
runBlockingはCoroutineScopeを作成し、その中で実行されたコルーチンが終了するまで待機する少し特殊な関数です。このとき、runBlockingを実行したスレッド上で待機します。
(少しCoroutineScopeから話はそれますが、) WebFluxやgRPC-kotlin, Armeriaなどを使っている場合、基本的にrunBlockingの出番はありません。
Spring WebMVCを使っているが、DAO層などがsuspend functionになっているときに使用します。通常のブロッキングスタイルな世界とコルーチンスタイルな世界の橋渡しとして使用する関数です。
(なので、もしもあなたのprojectが両方のスタイルを使って書く必要があるとき、DAO層などはsuspend functionで書いておくと両方のスタイルに対応することができます)
fun hoge() {
    // Spring WebMVCのcontroller/serviceクラス内のメソッド (ブロッキングスタイルな世界)

    val user = runBlocking { getUser(userId) } // getUserはsuspend function
}
Reactor(Mono)などを使っているとき以下のようにblock()を呼び出しますが、それと同じような話です。
fun hoge() {
    // Spring WebMVCのcontroller/serviceクラス内のメソッド (ブロッキングスタイルな世界)

    val user = getUser(userId).block() // getUserはMonoを返す
}
CoroutineScopeの作り方
以下のように作成することができます。
val scope = CoroutineScope(EmptyCoroutineContext)
CoroutineScopeの引数には、CoroutineContextを指定します。CoroutineContextについては後述します。EmptyCoroutineContextとはその名の通りなんの意味もない空のコンテキストだと思ってください。
いままでrunBlockingで行っていまいましたが、自分で作ったCoroutineScopeを使ってみましょう。
fun main() {
    printlnWithThread("start")

    val scope = CoroutineScope(EmptyCoroutineContext)
    scope.launch {
        delay(2000L)
        printlnWithThread("1")
    }
    scope.launch {
        delay(1000L)
        printlnWithThread("2")
    }

    printlnWithThread("end")
}

// 実行結果
[main] start
[main] end
これを実行すると、1と2が出力されないことがわかります。runBlockingはCoroutinesが終了するまで待機してくれるが、自分で作ったCoroutineScopeの場合は待機してくれません。以下のようにしてみましょう。
fun main() {
    printlnWithThread("start")

    val scope = CoroutineScope(EmptyCoroutineContext)
    scope.launch {
        delay(2000L)
        printlnWithThread("1")
    }
    scope.launch {
        delay(1000L)
        printlnWithThread("2")
    }

    Thread.sleep(3000)
    printlnWithThread("end")
}

// 実行結果
[main] start
[DefaultDispatcher-worker-2] 2
[DefaultDispatcher-worker-2] 1
[main] end
ちゃんと出力されるようになりました。
2と1の出力処理が実行されるスレッドがDefaultDispatcher-workerになっています。これもrunBlocking関数と違うポイントです。runBlocking関数の場合、runBlocking関数を呼び出したスレッド上でコルーチンを実行しますが、それ以外の場合はデフォルトだとKotlin Coroutines側が用意しているスレッドプールが使用されます。
これについては、CoroutineContext/CoroutineDispatcherについて説明するタイミングで詳しく説明します。
このセクションの冒頭で、CoroutineScopeはコルーチンを管理するものと表現しました。CoroutineScope#cancelを呼び出すと、そのCoroutineScopeから起動したコルーチンを一括ですべてキャンセルすることができます。
(ただ、実態としてはCoroutineScopeの機能ではなく、Jobの機能である。これについてはCoroutineContextのセクションにて後述します)
fun main() {
    printlnWithThread("1")

    val scope = CoroutineScope(EmptyCoroutineContext)
    scope.launch {
        delay(2000L)
        printlnWithThread("2")
    }
    scope.launch {
        delay(1000L)
        printlnWithThread("3")
    }

    scope.cancel()
    Thread.sleep(3000)
    printlnWithThread("4")
}

// 実行結果
// キャンセルされたので1, 4しか出力されない
[main] 1
[main] 4
CoroutineScopeの親子関係
CoroutineScopeは親子関係を持っていて、実はlaunch/asyncを実行するたびに子CoroutineScopeが作られます。
そして、CoroutineScopeはCoroutineContextを持っています。子CoroutineScopeが作られる際に、親CoroutineScopeが持っているCoroutineContextが引き継がれていきます。後述しますが、CoroutineContextは任意のタイミングで上書くこともできます。
CoroutineContextについての説明をまだしていないのでピンとこないと思いますが、この段階ではコルーチン/CoroutineScopeには親子関係がある、という認識を持っておいてください。
GlobalScope
GlobalScopeというあらかじめ用意されているCoroutineScopeがあります。
シングルトンとして用意されていて、アプリケーション(プロセス)と同じライフサイクルを持ちます。
現在、GlobalScopeはDelicateCoroutinesApiとなっています。web上の過去の記事を読むとGlobalScopeを使っている例が多いですが、新規ではあまりカジュアルに使用しないことをオススメします。
(もちろん諸々理解した上で、適切な用途で使うのはOK)
WebFluxやgRPC-kotlin, Armeriaでは?
これらの環境下でKotlin Coroutinesを使う場合、自分でrootとなるCoroutineScopeは作る機会は実はあまりありません。
だいたい、フレームワーク側でCoroutineScopeを作ってくれています。必要に応じて後述するCoroutineContextは自分で指定/カスタマイズすることはあります。
- WebFlux
- Armeria
- grpc-kotlin
CoroutineContext
CoroutineContextとはその名の通り、コルーチンごとに保持しているコンテキストです。様々な種類があり、Key-Value形式で保持されています。種類ごとに一意なKeyが用意されています。
親CoroutineScopeが保持するCoroutineContextが、子CoroutineScopeに引き継がれていきます。任意のタイミングで上書きすることもできます。
(再掲)
文章だとわかりにくいので、実際の例を見ましょう。
CoroutineDispatcherという種類のCoroutineContextがあります。詳しくは後述しますが、どのスレッドでコルーチンを実行するかを指定するためのCoroutineContextです。
以下のようなコードを書いてみます。
myExecutorというExecutorServiceを用意します。asCoroutineDispatcherという拡張関数を使うと、CoroutineDispatcherに変換することができます(myDispatcher)。
rootとなるCoroutineScopeを作るタイミングで、myDispatcherを渡します。今まではEmptyCoroutineContextを渡していた部分です。
実行結果をみるとわかりますが、myDispatcherを指定したことにより、1と2の出力はmyThread上で動いていることが確認できます。
一方、3と4の出力はDefaultDispatcher-worker上で動いています。3に関してはscope.launchするタイミングでcontextを上書きしたからです。4に関してはwithContextという関数を使って上書きしたからです。
fun main() {
    val myExecutor = Executors.newSingleThreadExecutor { r -> Thread(null, r, "myThread") }
    val myDispatcher = myExecutor.asCoroutineDispatcher()

    val scope = CoroutineScope(myDispatcher)
    scope.launch {
        // my-thread
        printlnWithThread("1")

        launch {
            // my-thread
            printlnWithThread("2")
        }

        launch(Dispatchers.Default) {
            // DefaultDispatcher-worker
            printlnWithThread("3")
        }

        withContext(Dispatchers.Default) {
            // DefaultDispatcher-worker
            printlnWithThread("4")
        }
    }

    Thread.sleep(1000)
}

// 実行結果
[myThread] 1
[DefaultDispatcher-worker-1] 3
[myThread] 2
[DefaultDispatcher-worker-1] 4
続いて、いくつか代表的なCoroutineContextを見ていきましょう
CoroutineName
おそらく一番シンプルなCoroutineContextです。(?)
Coroutinesに名前をつけることができます。
"-Dkotlinx.coroutines.debug=on"をJVMオプションにて付与する、スレッド名を取得する際にCoroutineNameが付与されるようになります。もちろん、main関数などで System.setProperty(DEBUG_PROPERTY_NAME, DEBUG_PROPERTY_VALUE_ON) を実行することで有効化することもできます。
コルーチンのdebugをしたいときに便利な仕組みです。
以下のコードを実行してみると、スレッドネームにCoroutineNameが付与されているのが確認できます。
fun main() {
    System.setProperty(DEBUG_PROPERTY_NAME, DEBUG_PROPERTY_VALUE_ON)

    val scope = CoroutineScope(CoroutineName("parent"))
    scope.launch {
        // CoroutineNameを上書きしていないので、parent
        printlnWithThread("1")

        launch {
            // CoroutineNameを上書きしていないので、parent
            printlnWithThread("2")
        }

        launch(CoroutineName("child1")) {
            // CoroutineNameを上書きしたので、child1
            printlnWithThread("3")
        }

        withContext(CoroutineName("child2")) {
            // CoroutineNameを上書きしたので、child2
            printlnWithThread("4")
        }
    }

    Thread.sleep(1000)
}

// 実行結果
[DefaultDispatcher-worker-1 @parent#1] 1
[DefaultDispatcher-worker-2 @parent#2] 2
[DefaultDispatcher-worker-2 @child1#3] 3
[DefaultDispatcher-worker-1 @child2#1] 4
CoroutineDispatcher
Coroutinesを動かすスレッドを指定することができます。使い方を誤ると性能問題が起きたりするので、CoroutineContextの中で一番重要なもの、だと思います。
コード例は先程紹介したので割愛します。
予め4つのCoroutineDispatcherが用意されています。
- Dispatchers.Default
- Dispatchers.IO
- Dispatchers.Unconfined
- Dispatchers.Main
Dispatchers.Default
その名のとおり、デフォルトで使用されるスレッドプールです。
CPUのコア数分用意されたスレッドプールを使用します。(いわゆるevent-loopスレッドのようなもの)
CPUを使用する処理の場合、これを使用してください。言い換えると、I/O処理のようなblockingな処理は実行してはいけません。そういう処理はDispatchers.IOで行ってください。
I/O処理が非同期化されているsuspend functionの場合は問題ありません。
Dispatchers.IO
IO処理のようなblockingな処理を行う場合、これを使用してください。
Dispatchers.Unconfined
基本的に使用することはありません。
特殊な挙動をするDispatcherです。Coroutinesを実行したときのスレッドが使用されます。更に途中でDispatcherが切り替えると、それ以降の処理もそのスレッド上で実行されます。
fun main() {
    val scope = CoroutineScope(Dispatchers.Unconfined)

    scope.launch {
        // main thread
        printlnWithThread("1")

        withContext(Dispatchers.Default) {
            // Dispatchers.Default thread
            printlnWithThread("2")
        }

        // Dispatchers.Default thread
        // withContextの変更がblockを出た後も継続する
        printlnWithThread("3")
    }

    Thread.sleep(1000)
}

// 実行結果
[main] 1
[DefaultDispatcher-worker-1] 2
[DefaultDispatcher-worker-1] 3
Dispatchers.Main
サーバーサイドでは使用することはありません。
AndroidやJavaFX, SwingのようなUIアプリケーションで使用するものです。
Dispatchers.Defaultでblokingな処理を実行するとどうなるか。逆にDispatchers.IOでCPU heavyな処理をするとどうなるか
実際に試してみるとわかります。
IO処理のかわりに、Thread.sleepでエミュレートしてみましょう。
Dispatchers.Defaultのとき:
fun main() {
    val startedAt = System.currentTimeMillis()
    runBlocking(Dispatchers.Default) {
        repeat(200) {
            launch {
                Thread.sleep(2_000) // 2sec
            }
        }
    }
    println("elapsed: ${System.currentTimeMillis() - startedAt}ms")
}

// 実行結果
elapsed: 26103ms
Dispatchers.IOのとき:
fun main() {
    val startedAt = System.currentTimeMillis()
    runBlocking(Dispatchers.IO) {
        repeat(200) {
            launch {
                Thread.sleep(2_000) // 2sec
            }
        }
    }
    println("elapsed: ${System.currentTimeMillis() - startedAt}ms")
}

// 実行結果
elapsed: 8079ms
Dispatchers.Defaultだと性能が出ないのがわかりますね。blockingな処理をすることで、CPU数ぶんしかないスレッドがつまってしまうからです。
withContextで任意の場所でスレッドをわけることもできるので、以下のような書き方をしても問題ありません。例えばWebFlux, gRPC-kotlin, Armeriaなどでコルーチンを使っているとき、JDBCに代表されるblocking I/Oを呼び出す場合はこのようにwithContextで切り替えましょう。
fun main() {
    val startedAt = System.currentTimeMillis()
    runBlocking(Dispatchers.Default) {
        repeat(200) {
            launch {
                withContext(Dispatchers.IO) { Thread.sleep(2_000) }
            }
        }
    }
    println("elapsed: ${System.currentTimeMillis() - startedAt}ms")
}
一方、CPUを使う処理の場合はどうでしょうか? これも実際に試してみましょう。
Dispatchers.Defaultのとき:
fun main() {
    val startedAt = System.currentTimeMillis()
    runBlocking(Dispatchers.Default) {
        repeat(100000000) {
            launch {
                var sum = 0
                repeat(1000) {
                    sum += it
                }
            }
        }
    }
    println("elapsed: ${System.currentTimeMillis() - startedAt}ms")
}

// 実行結果
elapsed: 67691ms
Dispatchers.IOのとき:
fun main() {
    val startedAt = System.currentTimeMillis()
    runBlocking(Dispatchers.IO) {
        repeat(100000000) {
            launch {
                var sum = 0
                repeat(1000) {
                    sum += it
                }
            }
        }
    }
    println("elapsed: ${System.currentTimeMillis() - startedAt}ms")
}

// 実行結果
elapsed: 94537ms
Dispatchers.Defaultのほうが性能がいいことがわかりますね。Dispatchers.IOだと無駄にコンテキストスイッチが発生する分、オーバーヘッドが大きいからです。
Job
すでに登場済のJobも実はCoroutineContextです。
同じJobをCoroutineContextとして持つコルーチンは、そのJobがcancelされるとコルーチンの処理がcancelされます。(ただし、厳密にいうとこの説明は正しくありません。現時点ではわかりやすさのためにこのような説明をします。詳細は後述。)
fun main() {
    printlnWithThread("1")

    val job = Job()
    val scope = CoroutineScope(job)
    scope.launch {
        delay(2000L)
        printlnWithThread("2")
    }
    scope.launch {
        delay(1000L)
        printlnWithThread("3")
    }

    job.cancel()
    Thread.sleep(3000)
    printlnWithThread("4")
}

// 実行結果
// キャンセルされたので1, 4しか出力されない
[main] 1
[main] 4
ところで上のコード、CoroutineScopeのセクションで記載したコードと似ていますね。実はこの2つのコードは同じものです。
(再掲)
fun main() {
    printlnWithThread("1")

    val scope = CoroutineScope(EmptyCoroutineContext)
    scope.launch {
        delay(2000L)
        printlnWithThread("2")
    }
    scope.launch {
        delay(1000L)
        printlnWithThread("3")
    }

    scope.cancel()
    Thread.sleep(3000)
    printlnWithThread("4")
}

// 実行結果
// キャンセルされたので1, 4しか出力されない
[main] 1
[main] 4
CoroutineScope(context: CoroutineContext)でCoroutineScopeを作成するとき、引数のcontextにJobが含まれていない場合、Jobを内部で生成するようになっています。
// CoroutineScopeの実装

public fun CoroutineScope(context: CoroutineContext): CoroutineScope =
    ContextScope(if (context[Job] != null) context else context + Job())
また、CoroutineScope#cancelメソッドは、実はCoroutineScopeが保持するCoroutineContextからJobを取り出し、Job#cancelメソッドを呼び出しています。
// CoroutineScope#cancelの実装

public fun CoroutineScope.cancel(cause: CancellationException? = null) {
    val job = coroutineContext[Job] ?: error("Scope cannot be cancelled because it does not have a job: $this")
    job.cancel(cause)
}
そういうわけで、実は同じコードでした。
もしも新しいJobで上書きした場合、そのコルーチンはキャンセルされなくなります。
fun main() {
    printlnWithThread("1")

    val job = Job()
    val scope = CoroutineScope(job)
    scope.launch {
        delay(2000L)
        printlnWithThread("2")
    }
    scope.launch(Job()) { // 上書き
        delay(1000L)
        printlnWithThread("3")
    }

    job.cancel()
    Thread.sleep(3000)
    printlnWithThread("4")
}

// 実行結果
[main] 1
[DefaultDispatcher-worker-1] 3
[main] 4
コルーチンのキャンセルについてはまだまだ解説する余地があるため、別のエラーハンドリングのセクションにて説明します。
Jobの引き継ぎは少しだけ特殊
先程、"親CoroutineScopeが保持するCoroutineContextが、子CoroutineScopeに引き継がれていきます"と説明しました。
実際に以下のコードを実行してみると、同じインスタンスのCoroutineNameが引き継がれていることが確認できます。
fun main() {
    val parentCoroutineName = CoroutineName("name")

    val scope = CoroutineScope(parentCoroutineName)
    scope.launch {
        // currentCoroutineContext()で現在のCoroutineContextが参照できる。CoroutineNameというKeyを指定することで、CoroutineNameが参照できる。
        val childCoroutineName = currentCoroutineContext()[CoroutineName]
        println("parentCoroutineName === childCoroutineName: ${parentCoroutineName === childCoroutineName}")
    }

    Thread.sleep(1000)
}

// 実行結果
parentCoroutineName === childCoroutineName: true
Jobは少し特殊で、同じインスタンスが引き継がれません。子CoroutineScopeを作るときに、親CoroutineScopeが保持するJobを親とする子Jobが内部的に作成されています。Jobには親子関係があります。
fun main() {
    val parentJob = Job()

    val scope = CoroutineScope(parentJob)
    scope.launch {
        val childJob = currentCoroutineContext()[Job]
        println("parentJob === childJob: ${parentJob === childJob}")
        println("parentJob.children.toList()[0] === childJob: ${parentJob.children.toList()[0] === childJob}")
    }

    Thread.sleep(1000)
}

// 実行結果
parentJob === childJob: false
parentJob.children.toList()[0] === childJob: true
なので、先程「同じJobをCoroutineContextとして持つコルーチンは、そのJobがcancelされるとコルーチンの処理がcancelされます」と書きましたが、正しくは「Jobをキャンセルすると、その子Jobもキャンセルされます」です。
また、後述する"協調的キャンセル"を理解するうえでも、このことを理解しておくことは大事です。
CoroutineExceptionHandler
CoroutineExceptionHandlerとは、コルーチン内でcatchされなかった例外を処理できる大域例外ハンドラのことです。これもCoroutineContextとして指定することができます。
fun main() {
    val exceptionHandler = CoroutineExceptionHandler { _, e ->
        println(e.toString())
    }
    val scope = CoroutineScope(exceptionHandler)
    scope.launch {
        delay(1000)
        throw Exception("error")
    }

    Thread.sleep(2000)
}

// 実行結果
java.lang.Exception: error
launch内の例外を補足しなかった場合、標準エラーに出力されるだけです。 そのため、全てのlaunchでtry-catchを実装をしておくことが望ましいです。
とはいえ、全てのlaunchで似たようなerror loggingハンドラを書くのは面倒くさいですし、ボイラープレートとなりますよね。CoroutineExceptionHandlerはこういった用途に向いています。
特定の例外をcatchしてfallback値を返すといったことはできません。そういうときは、launch内できちんとtry-catchを実装してください。
Javaのスレッドでいうところの、UncaughtExceptionHandler みたいなものです。
1つ注意点として、withContextでは設定することはできないようです。次のコードだとCoroutineExceptionHandlerは意図した動きをしません。
fun main() {
    val exceptionHandler = CoroutineExceptionHandler { _, e ->
        println(e.toString())
    }
    val scope = CoroutineScope(EmptyCoroutineContext)
    scope.launch {
        withContext(exceptionHandler) {
            delay(1000)
            throw Exception("error")
        }
    }

    Thread.sleep(2000)
}

// 実行結果
Exception in thread "DefaultDispatcher-worker-1" java.lang.Exception: error
    at com.example.demo.BasicKt$main11$1$1.invokeSuspend(Basic.kt:246)
    at kotlin.coroutines.jvm.internal.BaseContinuationImpl.resumeWith(ContinuationImpl.kt:33)
    at kotlinx.coroutines.DispatchedTask.run(DispatchedTask.kt:106)
    at kotlinx.coroutines.scheduling.CoroutineScheduler.runSafely(CoroutineScheduler.kt:571)
    at kotlinx.coroutines.scheduling.CoroutineScheduler$Worker.executeTask(CoroutineScheduler.kt:750)
    at kotlinx.coroutines.scheduling.CoroutineScheduler$Worker.runWorker(CoroutineScheduler.kt:678)
    at kotlinx.coroutines.scheduling.CoroutineScheduler$Worker.run(CoroutineScheduler.kt:665)
エラーハンドリングについては後ほど深堀りします。
ServiceLoader経由で共通的に適用する
とはいえ、CoroutineScopeを作るたびにCoroutineExceptionHandlerを毎回指定するのもめちゃくちゃダルいですよね。
ServiceLoaderにCoroutineExceptionHandlerの実装を登録しておくことで、そのCoroutineExceptionHandlerが全てのコルーチンで適用されるようになります。
この方法をオススメします。
error logを出力するCoroutineExceptionHandlerを用意しておきます。
package your.own_package // もちろん、任意のpackageでいい

class DefaultCoroutineExceptionHandler : CoroutineExceptionHandler,
    AbstractCoroutineContextElement(CoroutineExceptionHandler) {

    override fun handleException(context: CoroutineContext, exception: Throwable) {
        log.error(exception) { "Uncaught exception" }
    }

    companion object {
        private val log = KotlinLogging.logger {}
    }
}
そして、resources/META-INF/services/kotlinx.coroutines.CoroutineExceptionHandlerというファイルを用意し、以下のようなコードを書きます。
your.own_package.DefaultCoroutineExceptionHandler
- ref
MDCContext
※ org.jetbrains.kotlinx:kotlinx-coroutines-slf4j を依存にいれる必要があります。
コルーチンにて中断から再開したときに別のスレッドで実行されることがあるので、従来通りにMDCを利用することはできません。(MDCはスレッドローカルで実装されているためです)
MDCContextを使用すると、MDCに用いるMapをCoroutineContextとして保持し、コルーチンが実行されるときにそのMapをMDCとして設定してくれます。コルーチンが終了するときにMDCのクリアもしてくれます。
MDCをきちんと活用しておくと、datachainを用いたlog検索で非常に便利です。障害の問題調査などで役立つのでMDCは必ずちゃんと利用できるように整備しましょう。
fun main() {
    runBlocking(MDCContext(mapOf("hoge" to "hoge"))) {
        printlnWithThread("1, ${MDC.getCopyOfContextMap()}")

        // スレッドが変わってもMDCが伝搬される
        withContext(Dispatchers.Default) {
            printlnWithThread("2, ${MDC.getCopyOfContextMap()}")
        }

        // 上書きもできる
        launch(MDCContext(mapOf("bar" to "bar"))) {
            printlnWithThread("3, ${MDC.getCopyOfContextMap()}")
        }

        // 上書きもできる
        withContext(MDCContext(mapOf("fuga" to "fuga"))) {
            printlnWithThread("4, ${MDC.getCopyOfContextMap()}")
        }
    }
}

// 実行結果
// スレッドが変わってもMDCが引き継がれている。嬉しい。
[main] 1, {hoge=hoge}
[DefaultDispatcher-worker-1] 2, {hoge=hoge}
[main] 4, {fuga=fuga}
[main] 3, {bar=bar}
ThreadContextElement
Javaではスレッドローカルを活用したテクニックがよく使われます。(特にSpring WebMVCのようなアプリケーションでは。)
しかし、コルーチンは中断/再開されるときに別のスレッドで実行されることがあるため、スレッドローカルを活用することはできません。
以下のコードと結果を見てわかる通り、当然スレッドローカルは使えていません。
fun main() {
    // main threadにてhogeをセットする
    val threadLocal = ThreadLocal<String>().apply { set("hoge") }

    val scope = CoroutineScope(EmptyCoroutineContext)
    scope.launch {
        // DefaultDispatcher-worker上で動くので、threadLocal.get()はnull
        println(threadLocal.get())
    }

    Thread.sleep(1000)
}

// 実行結果
null
ThreadContextElementを使用すると、ThreadLocalの値をCoroutineContextとして保持し、コルーチンが実行されるときに値をThreadLocalに設定してくれます。コルーチンが終了するときにThreadLocalの値をクリアしてくれます。
なんだかMDCContextと似ていますね。それもそのはずで、実はMDCContextはThreadContextElementを使って実装されています。
ThreadLocalにあるasContextElementという拡張関数を呼び出すことで、CoroutineContextへ変換することができます。
fun main() {
    // main threadにてhogeをセットする
    val threadLocal = ThreadLocal<String>().apply { set("hoge") }

    val scope = CoroutineScope(threadLocal.asContextElement())
    scope.launch {
        // DefaultDispatcher-worker上で動くが、threadLocal.get()でhogeがとれる
        println(threadLocal.get())
    }

    Thread.sleep(1000)
}

// 実行結果
hoge
Javaの世界ではスレッドローカルを使って実装されている仕組み/資産が多いです。その仕組み/資産をコルーチンの世界でも活用できるので、ThreadContextElementは非常に便利です。
ReactorContext
kotlinx-coroutines-reactor を使用すると、Reactor ↔ Coroutineの相互変換を行うことができます。その際に、Reactor Contextとして保持している値をCoroutineContextにinjectしてくれます。
今回は詳細な説明は割愛します。
CoroutineContextを自作する
ここまでで色々なCoroutineContextを見てきましたが、CoroutineContextは自作することもできます。
ただし、経験的にゼロから自作する機会はあまりありません。作るとしても、ThreadContextElementをimplementしたものを作る事があるくらいでしょうか。例えば、Zipkin/BraveのTracingContext(スレッドローカルを使って実装されている)の伝搬をさせるときがこのケースに該当します。
次のコードは、ゼロから自作した簡単な例です。文字列値をContextとして保持し、任意のタイミングで参照できるようにしています。
data class MyCoroutineContext(
    val value: String
) : AbstractCoroutineContextElement(MyCoroutineContext) {
    companion object Key : CoroutineContext.Key<MyCoroutineContext>
}

fun main() {
    val context = MyCoroutineContext("hoge")

    val scope = CoroutineScope(context)
    scope.launch {
        // currentCoroutineContext()で現在のCoroutineContextを参照することができる。MyCoroutineContext(companion object) Keyで取得することで、MyCoroutineContextが取得できる
        println("1, ${currentCoroutineContext()[MyCoroutineContext]}")

        // 上書きもできる
        launch(MyCoroutineContext("bar")) {
            println("2, ${currentCoroutineContext()[MyCoroutineContext]}")
        }

        // 上書きもできる
        withContext(MyCoroutineContext("fuga")) {
            println("3, ${currentCoroutineContext()[MyCoroutineContext]}")
        }
    }

    Thread.sleep(1000)
}

// 実行結果
1, MyCoroutineContext(value=hoge)
2, MyCoroutineContext(value=bar)
3, MyCoroutineContext(value=fuga)
CoroutineContextはこれまで紹介してきた複数の種類があり、それぞれの種類ごとに以下のような感じでKey-Value構造で保持されています。
(再掲)
// あくまでイメージ
mapOf(
    "JobのKey" to "Job",
    "CoroutineDispatcherのKey" to "CoroutineDispatcher",
    "CoroutineExceptionHandlerのKey" to "CoroutineExceptionHandler",
    "MDCContextのKey" to "MDCContext"
)
そのため、自作するときは必ず対応するKeyも用意する必要があります。前述したコードのAbstractCoroutineContextElement(MyCoroutineContext)でそのへんを行っています。
このあたりはいったんは深追いしなくてもいいです。自作する機会があったときに、Kotlin Coroutinesが用意しているMDCContext等の実装を参考にしながら実装してください。
CoroutineContextの合成
今までのコード例では1つのCoroutineContextしか使用していませんでしたが、複数のCoroutineContextを使用することができます。
次のように、それぞれのCoroutineContextを "+" で連結するだけで合成していくことができます。先程CoroutineContextはKey-Value構造で保持されているといいましたが、合成するたびにKey-Valueが追加されていくと考えてください。
val context = Job() + Dispatchers.Default + MDCContext()
同じ種類のCoroutineContextを合成すると、後から合成したもので上書きされます。
fun main() {
    val scope = CoroutineScope(CoroutineName("hoge") + CoroutineName("bar"))
    scope.launch {
        println("${currentCoroutineContext()[CoroutineName]}")
    }

    Thread.sleep(1000)
}

// 実行結果
// barになっている
CoroutineName(bar)
Error Handling
コルーチンは使い方によってエラーハンドリングがややこしくなるので、注意が必要です。(とはいえ、従来の非同期処理におけるエラーハンドリングよりかはだいぶ簡単です)
逆にいうと単純な使い方をしている限りにおいては、ほとんど従来の感覚(?)通りに書くことができます。このセクションを読むと混乱してしまうかもしれませんが、あまり心配しないでもOKです。
いずれにせよ、不慣れ&不安な場合はunit testで挙動確認をしながら書くといいと思います。
CoroutineScope内でのtry-catch
原則的に同じCoroutinieScope内でしかtry-catchを行うことはできません。この原則に従っている限りは、わりと直感的に動くと思います。
fun main() {
    val scope = CoroutineScope(EmptyCoroutineContext)
    scope.launch {
        try {
            throw Exception("error")
        } catch (e: Exception) {
            println("caught: $e")
        }
    }

    Thread.sleep(1000)
    println("end")
}

// 実行結果
caught: java.lang.Exception: error
end
asyncを使った場合も、直感的に動くと思います。例外をキャッチしてfallbackした値も取得することができています。
fun main() {
    val scope = CoroutineScope(EmptyCoroutineContext)
    val result = scope.async {
        try {
            throw Exception("error")
        } catch (e: Exception) {
            "fallback value"
        }
    }

    runBlocking { println("result: ${result.await()}") }
    println("end")
}

// 実行結果
result: fallback value
end
coroutineScope関数を使ったtry-catch
coroutineScope関数(小文字始まり)を使うことで、囲った部分のコルーチンの完了を待つことができます。runBlockingと少し似ていますね。
これを使うと、launch/asyncの外側でもtry-catchを行うことができます。
fun main() {
    val scope = CoroutineScope(EmptyCoroutineContext)
    scope.launch {
        try {
            coroutineScope {
                launch {
                    delay(1000)
                    throw Exception("error")
                }
            }
        } catch (e: Exception) {
            println("caught: $e")
        }

        println("hoge")
    }

    Thread.sleep(2000)
}

// 実行結果
// hogeが後ろに出力されていることから、coroutineScope内のlaunchが完了するのを待っていることがわかります
caught: java.lang.Exception: error
hoge
ちなみに、runBlockingのときも同じような動きをします。
fun main() {
    try {
        runBlocking {
            launch {
                delay(1000)
                throw Exception("error")
            }
        }
    } catch (e: Exception) {
        println("caught: $e")
    }

    println("hoge")
}

// 実行結果
caught: java.lang.Exception: error
hoge
coroutineScopeは、通常はasyncと一緒に使うことが多いです。
fun main() {
    val scope = CoroutineScope(EmptyCoroutineContext)
    scope.launch {
        try {
            coroutineScope {
                val deferred1 = async {
                    delay(1000)
                    2
                }
                val deferred2 = async {
                    delay(1000)
                    throw RuntimeException("error")
                    3
                }
                println("${deferred1.await() + deferred2.await()}")
            }
        } catch (e: Exception) {
            println("caught: $e")
        }
    }

    Thread.sleep(2000)
}

// 実行結果
caught: java.lang.RuntimeException: error
もしも上のコードで、coroutineScopeを使わなかった場合、少し面白い動きをします。
fun main() {
    val exceptionHandler = CoroutineExceptionHandler { _, e ->
        println("caught at exceptionHandler: $e")
    }
    val scope = CoroutineScope(exceptionHandler)
    scope.launch {
        try {
            val deferred1 = async {
                delay(1000)
                2
            }
            val deferred2 = async {
                delay(1000)
                throw RuntimeException("error")
                3
            }
            println("${deferred1.await() + deferred2.await()}")
        } catch (e: Exception) {
            println("caught: $e")
        }
    }

    Thread.sleep(2000)
}

// 実行結果
caught: kotlinx.coroutines.JobCancellationException: StandaloneCoroutine is cancelling; job=StandaloneCoroutine{Cancelling}@7dcaff40
caught at exceptionHandler: java.lang.RuntimeException: error
catch句で捕捉された例外が、JobCancellationExceptionとなっています。これはdeferred2でエラーが起きたことにより、deferred1が協調的にキャンセルされたからです。これについては後述します。
また、scope全体で捕捉されなかった例外があったためエラー扱いとなり、CoroutineExceptionHandlerが作動しています。
ちなみに、先にdeferred2をawaitするとこのようになります。
...省略
println("${deferred2.await() + deferred1.await()}")
...省略

// 実行結果
caught: java.lang.RuntimeException: error
caught at exceptionHandler: java.lang.RuntimeException: error
catch句で捕捉された例外が、RuntimeExceptionとなっています。deferred2で発生した例外です。
また、scope全体で捕捉されなかった例外があったためエラー扱いとなり、CoroutineExceptionHandlerが作動しています。
なんだか難しいと思いますが、以下の2点を押さえておけばOKです。
- 同じCoroutinieScope内でしかtry-catchはできない
- CoroutineScopeの外側で例外をtry-catchしたいときは、coroutineScope関数で囲う
いわゆる、Structured concurrencyというものです。詳しく知りたい人はこの記事を読みましょう。
https://elizarov.medium.com/structured-concurrency-722d765aa952
catchしなかった例外はどうなる?
捕捉されなかった例外はどうなるかも確認してみましょう。
launchの場合、CoroutineExceptionHandlerを紹介したときにもすでに説明しましたが、標準エラーに出力されます。これだと気づくことができないのでCoroutineExceptionHandlerを使ってちゃんとerror logを出すようにしましょう。
fun main() {
    val scope = CoroutineScope(EmptyCoroutineContext)
    scope.launch {
        throw Exception("error")
    }

    Thread.sleep(1000)
    println("end")
}

// 実行結果
// 標準エラーに出力されるだけ
Exception in thread "DefaultDispatcher-worker-2" java.lang.Exception: error
    at com.example.demo.BasicKt$main15$1.invokeSuspend(Basic.kt:328)
    at kotlin.coroutines.jvm.internal.BaseContinuationImpl.resumeWith(ContinuationImpl.kt:33)
    at kotlinx.coroutines.DispatchedTask.run(DispatchedTask.kt:106)
    at kotlinx.coroutines.scheduling.CoroutineScheduler.runSafely(CoroutineScheduler.kt:571)
    at kotlinx.coroutines.scheduling.CoroutineScheduler$Worker.executeTask(CoroutineScheduler.kt:750)
    at kotlinx.coroutines.scheduling.CoroutineScheduler$Worker.runWorker(CoroutineScheduler.kt:678)
    at kotlinx.coroutines.scheduling.CoroutineScheduler$Worker.run(CoroutineScheduler.kt:665)
end
fun main() {
    val exceptionHandler = CoroutineExceptionHandler { _, e ->
        log.error(e) { "uncaught exception" }
    }
    val scope = CoroutineScope(exceptionHandler)
    scope.launch {
        throw Exception("error")
    }

    Thread.sleep(1000)
    println("end")
}

// 実行結果
// CoroutineExceptionHandlerでlog.errorで処理される
16:27:20.450 [DefaultDispatcher-worker-1] ERROR com.example.demo.Basic - uncaught exception
java.lang.Exception: error
    at com.example.demo.BasicKt$main15$1.invokeSuspend(Basic.kt:332)
    at kotlin.coroutines.jvm.internal.BaseContinuationImpl.resumeWith(ContinuationImpl.kt:33)
    at kotlinx.coroutines.DispatchedTask.run(DispatchedTask.kt:106)
    at kotlinx.coroutines.scheduling.CoroutineScheduler.runSafely(CoroutineScheduler.kt:571)
    at kotlinx.coroutines.scheduling.CoroutineScheduler$Worker.executeTask(CoroutineScheduler.kt:750)
    at kotlinx.coroutines.scheduling.CoroutineScheduler$Worker.runWorker(CoroutineScheduler.kt:678)
    at kotlinx.coroutines.scheduling.CoroutineScheduler$Worker.run(CoroutineScheduler.kt:665)
end
asyncの場合は、結果が違います。await()を呼び出して結果を取得しようとするタイミングで例外が投げられます。
逆にいうとawait()を呼び出さないとエラーが起きたことを知るすべがないわけですが、asyncを使ってawait()を呼び出さないことは基本的にないはずなので気にしなくていいでしょう。
fun main() {
    val scope = CoroutineScope(EmptyCoroutineContext)
    val result = scope.async {
        throw Exception("error")
    }

    runBlocking {
        try {
            result.await()
        } catch (e: Exception) {
            println("caught: $e")
        }
    }
    println("end")
}

// 実行結果
caught: java.lang.Exception: error
end
ちなみに、CoroutineExceptionHandlerはasyncのときは作動しません。await()を呼び出したときに例外が飛ぶわけなので、作動しなくても問題ないですね。
fun main() {
    val exceptionHandler = CoroutineExceptionHandler { _, e ->
        log.error(e) { "uncaught exception" }
    }
    val scope = CoroutineScope(exceptionHandler)
    val result = scope.async {
        throw Exception("error")
    }

    runBlocking {
        try {
            result.await()
        } catch (e: Exception) {
            println("caught: $e")
        }
    }
    println("end")
}

// 実行結果
caught: java.lang.Exception: error
end
では、次のようにlaunch内でasyncを実行した場合はどうなるでしょうか?この場合はCoroutineExceptionHandlerが作動します。うーん、難しいですね。
後述する"エラーと協調的なキャンセル"にて説明しますが、コルーチンのエラーは子(async)から親(launch)へと伝搬します。エラーとなったlaunchのコルーチンがあったため、CoroutineExceptionHandlerが作動したと考えると理解しやすいと思います。
fun main() {
    val exceptionHandler = CoroutineExceptionHandler { _, e ->
        log.error(e) { "uncaught exception" }
    }
    val scope = CoroutineScope(exceptionHandler)
    scope.launch {
        async {
            throw Exception("error")
        }
    }

    Thread.sleep(1000)
    println("end")
}

// 実行結果
17:38:58.592 [DefaultDispatcher-worker-2] ERROR com.example.demo.Basic - uncaught exception
java.lang.Exception: error
    at com.example.demo.BasicKt$main15$1$1.invokeSuspend(Basic.kt:331)
    at kotlin.coroutines.jvm.internal.BaseContinuationImpl.resumeWith(ContinuationImpl.kt:33)
    at kotlinx.coroutines.DispatchedTask.run(DispatchedTask.kt:106)
    at kotlinx.coroutines.scheduling.CoroutineScheduler.runSafely(CoroutineScheduler.kt:571)
    at kotlinx.coroutines.scheduling.CoroutineScheduler$Worker.executeTask(CoroutineScheduler.kt:750)
    at kotlinx.coroutines.scheduling.CoroutineScheduler$Worker.runWorker(CoroutineScheduler.kt:678)
    at kotlinx.coroutines.scheduling.CoroutineScheduler$Worker.run(CoroutineScheduler.kt:665)
end
(おまけ) CancellationException
コルーチンがキャンセルされたとき、CancellationExceptionとして処理されます。言い換えると、CancellationExceptionはコルーチンにおいてはキャンセルを示す特別な例外です。そのため、catchしたときに別の例外にwrapするといったことを望ましくありません。catchしたときはlogなどを出してCancellationExceptionのままre-throwしましょう。でないと、ときに意図しない挙動をおこします。(あんま大事にはならないので、不慣れなうちは気にしなくてもいいです)
例えば、先程CoroutineContextとして紹介したCoroutineExceptionHandlerの挙動を見てみましょう。CoroutineExceptionHandlerは、CancellationExceptionはハンドリングしません。
次のコードを実行します。コルーチン1にて例外が発生したためコルーチン2がキャンセルされます。CoroutineExceptionHandlerはcatchされなかった例外を処理するものですが、出力を見るとCancellationExceptionはハンドリングしていないことが確認できますね。
fun main() {
    val exceptionHandler = CoroutineExceptionHandler { _, e ->
        log.error { "caught at CoroutineExceptionHandler: $e" }
    }
    val scope = CoroutineScope(exceptionHandler)
    scope.launch { // コルーチン1
        delay(1000)
        throw Exception("error")
    }
    scope.launch { // コルーチン2
        try {
            delay(2000)
        } catch (e: CancellationException) {
            println("canceled")
            throw e
        }
    }

    Thread.sleep(3000L)
}

// 実行結果
canceled
11:23:08.146 [DefaultDispatcher-worker-1] ERROR com.example.demo.Basic - caught at CoroutineExceptionHandler: java.lang.Exception: error
次のようなコードに変えてみましょう。例外を別の例外としてwrapして投げるといったコードです。このとき、CancellationExceptionがMyExceptionに変換されてしまうため、CoroutineExceptionHandlerで処理されてしまい、無駄なerror logが出力されてしまっています。
fun main() {
    val exceptionHandler = CoroutineExceptionHandler { _, e ->
        log.error { "caught at CoroutineExceptionHandler: $e" }
    }
    val scope = CoroutineScope(exceptionHandler)
    scope.launch { // コルーチン1
        delay(1000)
        throw Exception("error")
    }
    scope.launch { // コルーチン2
        try {
            delay(2000)
        } catch (e: Exception) {
            println("wrap MyException")
            throw MyException(e)
        }
    }

    Thread.sleep(3000L)
}

// 実行結果
wrap MyException
11:22:14.168 [DefaultDispatcher-worker-1] ERROR com.example.demo.Basic - caught at CoroutineExceptionHandler: java.lang.Exception: error
11:22:14.168 [DefaultDispatcher-worker-2] ERROR com.example.demo.Basic - caught at CoroutineExceptionHandler: com.example.demo.MyException: kotlinx.coroutines.JobCancellationException: Parent job is Cancelling; job=JobImpl{Cancelling}@504a91ab
なので、"catch (e: Exception)"のような記述をするときは少しだけ注意してみてください。
エラーと協調的なキャンセル
Kotlin Coroutinesでは、同じJobを持つ複数のコルーチンを動かす場合で、そのうちの1つでエラー(捕捉されなかった例外)が起きたときは他のコルーチンの処理が協調的にキャンセルされます。
fun main() {
    val scope = CoroutineScope(EmptyCoroutineContext)
    scope.launch {
        launch {
            delay(1000)
            throw Exception("error") // このコルーチンでエラーが起きる
        }

        launch {
            println("start 1")
            delay(2000)
            println("end 1")
        }
    }
    scope.launch {
        println("start 2")
        delay(2000)
        println("end 2")
    }
    scope.launch {
        launch {
            println("start 3")
            delay(2000)
            println("end 3")
        }
    }

    Thread.sleep(3000)
    println("end")
}

// 実行結果
start 2
start 1
start 3
Exception in thread "DefaultDispatcher-worker-4" java.lang.Exception: error
    at com.example.demo.BasicKt$main15$1$1.invokeSuspend(Basic.kt:329)
    at kotlin.coroutines.jvm.internal.BaseContinuationImpl.resumeWith(ContinuationImpl.kt:33)
    at kotlinx.coroutines.DispatchedTask.run(DispatchedTask.kt:106)
    at kotlinx.coroutines.scheduling.CoroutineScheduler.runSafely(CoroutineScheduler.kt:571)
    at kotlinx.coroutines.scheduling.CoroutineScheduler$Worker.executeTask(CoroutineScheduler.kt:750)
    at kotlinx.coroutines.scheduling.CoroutineScheduler$Worker.runWorker(CoroutineScheduler.kt:678)
    at kotlinx.coroutines.scheduling.CoroutineScheduler$Worker.run(CoroutineScheduler.kt:665)
end

ただし、明示的に別のJobを保持させるとキャンセルされなくなります。以下の例だと、"end 3"が出力されていますね。
fun main() {
    val scope = CoroutineScope(EmptyCoroutineContext)
    scope.launch {
        launch {
            delay(1000)
            throw Exception("error") // このコルーチンでエラーが起きる
        }

        launch {
            println("start 1")
            delay(2000)
            println("end 1")
        }
    }
    scope.launch {
        println("start 2")
        delay(2000)
        println("end 2")
    }
    scope.launch(Job()) { // 別のJobにする
        launch {
            println("start 3")
            delay(2000)
            println("end 3")
        }
    }

    Thread.sleep(3000)
    println("end")
}

// 実行結果
start 2
start 1
start 3
Exception in thread "DefaultDispatcher-worker-4" java.lang.Exception: error
    at com.example.demo.BasicKt$main15$1$1.invokeSuspend(Basic.kt:329)
    at kotlin.coroutines.jvm.internal.BaseContinuationImpl.resumeWith(ContinuationImpl.kt:33)
    at kotlinx.coroutines.DispatchedTask.run(DispatchedTask.kt:106)
    at kotlinx.coroutines.scheduling.CoroutineScheduler.runSafely(CoroutineScheduler.kt:571)
    at kotlinx.coroutines.scheduling.CoroutineScheduler$Worker.executeTask(CoroutineScheduler.kt:750)
    at kotlinx.coroutines.scheduling.CoroutineScheduler$Worker.runWorker(CoroutineScheduler.kt:678)
    at kotlinx.coroutines.scheduling.CoroutineScheduler$Worker.run(CoroutineScheduler.kt:665)
end 3
end
また、協調的なキャンセルをするのは例外が発生したときのみです。cancelメソッドによるキャンセルは、そのJobのみしかキャンセルされません。
fun main() {
    val scope = CoroutineScope(EmptyCoroutineContext)
    scope.launch {
        println("start 1")
        delay(1000)
        println("end 1")
    }
    scope.launch {
        launch {
            println("start 2")
            delay(1000)
            println("end 2")
        }
    }
    val job = scope.launch {
        delay(Long.MAX_VALUE)
    }
    job.cancel()

    Thread.sleep(2000)
    println("end")
}

// 実行結果
start 1
start 2
end 1
end 2
end
親Jobをキャンセルしたときは、子以下のJobが全てキャンセルされます。(これはすでに説明したとおりです)
fun main() {
    val job = Job()
    val scope = CoroutineScope(job)
    scope.launch {
        println("start 1")
        delay(1000)
        println("end 1")
    }
    scope.launch {
        launch {
            println("start 2")
            delay(1000)
            println("end 2")
        }
    }

    Thread.sleep(200)
    job.cancel()

    Thread.sleep(2000)
    println("end")
}

// 実行結果
start 1
start 2
end
SupervisorJob
協調的なキャンセルをしてほしくない場面もあるでしょう。先程書いたように異なるJobを指定してもいいですが、いちいち指定するのは面倒です。
そういうケースでは、SupervisorJobを使いましょう。
fun main() {
    val supervisor = SupervisorJob()
    val scope = CoroutineScope(supervisor)
    scope.launch {
        println("start 1")
        delay(1000)
        println("end 1")
    }
    scope.launch {
        println("start 2")
        delay(1000)
        println("end 2")
    }
    scope.launch {
        throw Exception("error")
    }

    Thread.sleep(2000)
    println("end")
}

// 実行結果
start 1
start 2
Exception in thread "DefaultDispatcher-worker-3" java.lang.Exception: error
    at com.example.demo.BasicKt$main15$3.invokeSuspend(Basic.kt:339)
    at kotlin.coroutines.jvm.internal.BaseContinuationImpl.resumeWith(ContinuationImpl.kt:33)
    at kotlinx.coroutines.DispatchedTask.run(DispatchedTask.kt:106)
    at kotlinx.coroutines.scheduling.CoroutineScheduler.runSafely(CoroutineScheduler.kt:571)
    at kotlinx.coroutines.scheduling.CoroutineScheduler$Worker.executeTask(CoroutineScheduler.kt:750)
    at kotlinx.coroutines.scheduling.CoroutineScheduler$Worker.runWorker(CoroutineScheduler.kt:678)
    at kotlinx.coroutines.scheduling.CoroutineScheduler$Worker.run(CoroutineScheduler.kt:665)
end 1
end 2
end
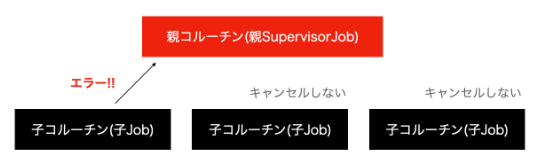
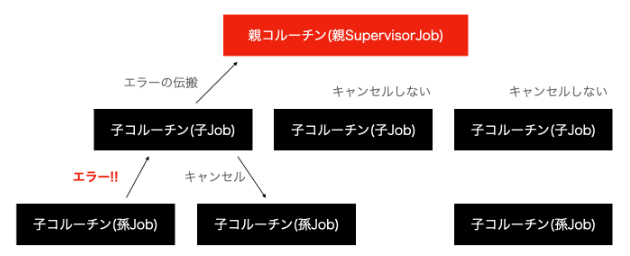
ただし、SupervisorJobの子はSupervisorJobではないので注意しましょう。 "Jobの引き継ぎは少しだけ特殊"というセクションで説明しましたが、Jobはそのまま引き継がれるのではなく、親子関係をもつ新しいJobが作成されます。
fun main() {
    val supervisor = SupervisorJob()
    val scope = CoroutineScope(supervisor)
    scope.launch {
        launch {
            delay(1000)
            throw Exception("error") // このコルーチンでエラーが起きる
        }

        launch {
            println("start 1")
            delay(2000)
            println("end 1")
        }
    }
    scope.launch {
        println("start 2")
        delay(2000)
        println("end 2")
    }
    scope.launch {
        launch {
            println("start 3")
            delay(2000)
            println("end 3")
        }
    }

    Thread.sleep(3000)
    println("end")
}

// 実行結果
// "end 1"がキャンセルされてしまっている
start 2
start 1
start 3
Exception in thread "DefaultDispatcher-worker-3" java.lang.Exception: error
    at com.example.demo.BasicKt$main15$1$1.invokeSuspend(Basic.kt:331)
    at kotlin.coroutines.jvm.internal.BaseContinuationImpl.resumeWith(ContinuationImpl.kt:33)
    at kotlinx.coroutines.DispatchedTask.run(DispatchedTask.kt:106)
    at kotlinx.coroutines.scheduling.CoroutineScheduler.runSafely(CoroutineScheduler.kt:571)
    at kotlinx.coroutines.scheduling.CoroutineScheduler$Worker.executeTask(CoroutineScheduler.kt:750)
    at kotlinx.coroutines.scheduling.CoroutineScheduler$Worker.runWorker(CoroutineScheduler.kt:678)
    at kotlinx.coroutines.scheduling.CoroutineScheduler$Worker.run(CoroutineScheduler.kt:665)
end 3
end 2
end
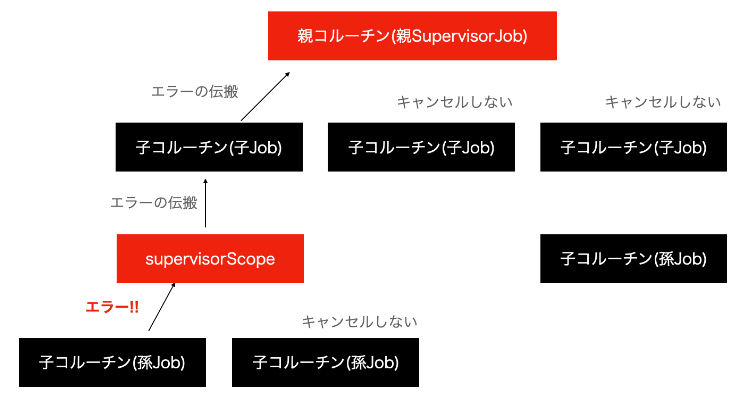
この場合、supervisorScope関数を使用しましょう。
fun main() {
    val supervisor = SupervisorJob()
    val scope = CoroutineScope(supervisor)
    scope.launch {
        supervisorScope {
            launch {
                delay(1000)
                throw Exception("error") // このコルーチンでエラーが起きる
            }

            launch {
                println("start 1")
                delay(2000)
                println("end 1")
            }
        }
    }
    scope.launch {
        println("start 2")
        delay(2000)
        println("end 2")
    }
    scope.launch {
        launch {
            println("start 3")
            delay(2000)
            println("end 3")
        }
    }

    Thread.sleep(3000)
    println("end")
}

// 実行結果
start 2
start 3
start 1
Exception in thread "DefaultDispatcher-worker-5" java.lang.Exception: error
    at com.example.demo.BasicKt$main15$1$1$1.invokeSuspend(Basic.kt:333)
    at kotlin.coroutines.jvm.internal.BaseContinuationImpl.resumeWith(ContinuationImpl.kt:33)
    at kotlinx.coroutines.DispatchedTask.run(DispatchedTask.kt:106)
    at kotlinx.coroutines.scheduling.CoroutineScheduler.runSafely(CoroutineScheduler.kt:571)
    at kotlinx.coroutines.scheduling.CoroutineScheduler$Worker.executeTask(CoroutineScheduler.kt:750)
    at kotlinx.coroutines.scheduling.CoroutineScheduler$Worker.runWorker(CoroutineScheduler.kt:678)
    at kotlinx.coroutines.scheduling.CoroutineScheduler$Worker.run(CoroutineScheduler.kt:665)
end 2
end 3
end 1
end
Other Tips
Lazily started async
asyncの実行をawait()を呼び出してから行うことができます。
例えばデフォルトではasyncを呼び出したタイミングで実行されるので、次のコードの所要時間が1secほどです。
fun main() {
    runBlocking {
        val started = System.currentTimeMillis()
        val deferred1 = async {
            delay(1000)
            2
        }
        val deferred2 = async {
            delay(1000)
            3
        }

        delay(1000) // ここで1sec待つ

        println("${deferred1.await() + deferred2.await()}")
        println("elapsed: ${System.currentTimeMillis() - started}ms")
    }
}

// 実行結果
5
elapsed: 1012ms
Lazy startを使用しようすると、結果が変わります。await()実行したタイミングで実行されるので、3secほどかかるようになります。
fun main() {
    runBlocking {
        val started = System.currentTimeMillis()
        val deferred1 = async(start = CoroutineStart.LAZY) {
            delay(1000)
            2
        }
        val deferred2 = async(start = CoroutineStart.LAZY) {
            delay(1000)
            3
        }

        delay(1000) // ここで1sec待つ

        // deferred1.await()で1sec待つ
        // deferred2.await()で1sec待つ
        println("${deferred1.await() + deferred2.await()}")
        println("elapsed: ${System.currentTimeMillis() - started}ms")
    }
}

// 実行結果
5
elapsed: 3021ms
Suspend function内でasyncを使って並列化したいとき
asyncはCoroutineScopeの拡張関数なので、suspend function内では使うことはできません。
suspend function内asyncを使いたいときは、coroutineScope関数を使用してください。
suspend fun someFunc(): Int {
    return coroutineScope {
        val one = async { ... }
        val two = async { ... }
        one.await() + two.await()
    }
}
Javaの非同期interfaceをコルーチン化(suspend function)する
Kotlin Coroutines側で変換することができる便利な関数を用意してくれています。
コールバック
suspendCancellableCoroutine関数 or suspendCoroutine関数 を使えばOKです。
CompletableFuture (CompletionStage)
CompletionStage.await という拡張関数を使えばOKです。
Mono (Reactor)
Mono.awaitSingle という拡張関数を使えばOKです。
最後に
覚えること多すぎん!?と思った人もいると思います。
WebFluxやgRPC-kotlin, Armeriaをコルーチンを使って書くだけなら、実はあまり難しくありません。「ようわからんが、suspend functionを使って書けばいいんでしょ?」的なノリと雰囲気で書くことはできます。そこがKotlin Coroutinesの良いところでもあります。
例えば、WebFluxでRedis(Lettuce), WebClient, MyBatisを使った簡単な例を書いてみましょう。
Redisに関してはLettuceのRedisClusterCoroutinesCommandsを使い、WebClientに関してはawaitBody(Mono → suspend function)を使い、MyBatisはwithContext(Dispatchers.IO)を使っているだけです。例外(try-catch)も今まで通りです。ほとんど従来通りの書き方で簡単ですね。
@RestController
class SampleController(
    private val sampleService: SampleService,
) {
    @GetMapping("/sample")
    suspend fun sample(): SampleResponse {
        try {
            return sampleService.someOperation()
        } catch (e: Exception) {
            throw ResponseStatusException(HttpStatus.INTERNAL_SERVER_ERROR)
        }
    }
}

@Service
class SampleService(
    private val redis: RedisClusterCoroutinesCommands<String, String>,
    private val httpClient: WebClient,
    private val sampleDao: SampleDao
) {
    suspend fun someOperation(): SampleResponse {
        val valueFromRedis = redis.get("SOME_KEY")
        val valueFromApi = httpClient.get().uri("/some/path").retrieve().awaitBody<SampleData>()
        val valueFromMySQL = withContext(Dispatchers.IO) {
            sampleDao.select("SOME_ID")
        }

        return SampleResponse(valueFromRedis, valueFromApi, valueFromMySQL)
    }
}